The radiator started with its usual faint metallic ticking, the familiar cue that warmth was on its way. Outside, the wind swept through bare branches, nudging window frames as a quiet reminder that colder days were here. Indoors, though the air felt warm, it carried a dry, thin edge. Your throat itched, your hands felt tight, and a sneeze seemed inevitable. Then you remembered something — maybe a tip from an older relative or a forgotten article — about placing a glass of water near the radiator to help the room feel cozier. It sounded like folklore. Still, as the dryness deepened, you filled a glass and set it beside the heat. Gradually, and almost invisibly, something shifted. Winter’s quiet lessons always arrive this way.
The Hidden Science in That Simple Glass
At first, it may seem unlikely that a mere glass of water can affect room comfort. It doesn’t produce heat. It’s not a heater in disguise. But its value lies not in making the room warmer, but in helping your body feel the warmth more effectively. When radiators heat up, they also dry out the air, often without notice. You begin to feel it through scratchy throats, static shocks, and tight skin. What’s easy to miss is how dry air changes how your body perceives warmth.
How Dryness Tricks the Body’s Thermostat
Your body naturally exchanges heat with the surrounding air. When the air is dry, moisture evaporates faster from your skin and breath, drawing heat away from your body. The radiator might be working perfectly, but your body experiences a subtle chill. This is where that glass of water starts to matter. When placed near a radiator, it absorbs heat and slowly evaporates, adding a bit of moisture back into the room. Even a small increase in humidity helps reduce that heat loss from your skin and lungs, making the warmth feel fuller and more comfortable.

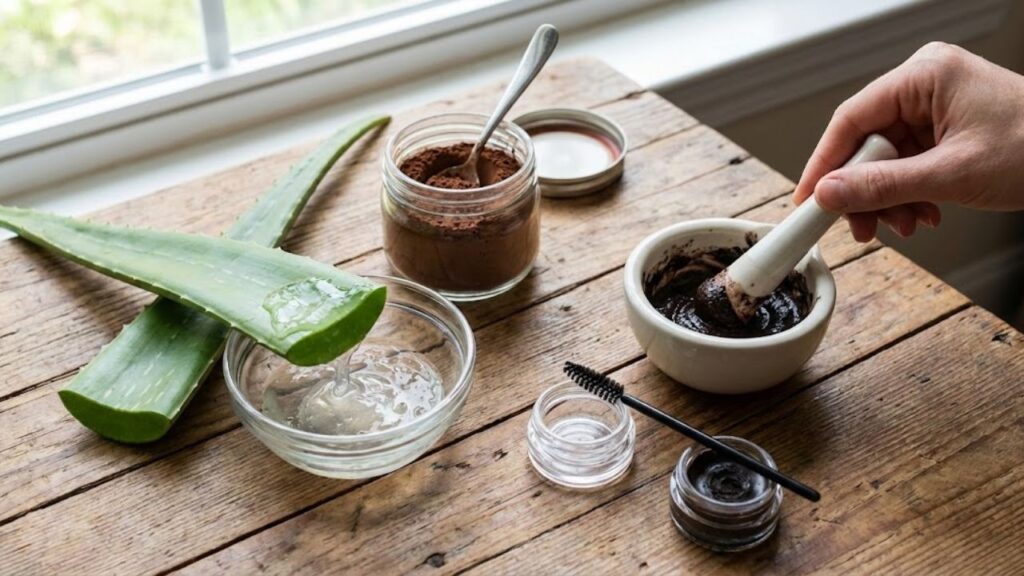
Aloe Vera: Nature’s Lightweight Brow Styler
Long before commercial beauty aisles existed, aloe vera was known for its soothing touch. Its natural texture is cool, soft, and non-sticky—perfect for delicate use. When applied to brows, it offers gentle control without stiffness. In DIY brow gel recipes, aloe is the star. It provides a flexible hold while nourishing the skin and hair with each use. Choosing a pure, additive-free aloe gel brings hydration into your routine with every swipe, making it feel more like skincare than makeup.
 How to make a rich, restaurant-quality pasta sauce at home using only 4 simple ingredients
Cocoa Powder: Adding Natural Tint with Warmth
Beyond desserts, cocoa powder brings rich, earthy tones to homemade beauty. Its soft brown hue suits a wide range of brows—from light to medium-dark. Mixed with aloe, it forms a subtle tint that defines without overpowering. The beauty lies in how much control you have: a little adds just a hint of shape, a bit more deepens the tone. The result is a natural, soft look that pairs beauty with simplicity—especially when the same ingredient could be used in hot chocolate just hours before.
Gathering Your Simple DIY Kit
Creating your own brow gel doesn’t feel like a chore—it feels like a quiet personal ritual. A clean jar, a spoon, a spoolie brush—these modest tools turn into instruments of care. At its simplest, the recipe requires only aloe vera gel and cocoa powder. For those who want to experiment, a drop of jojoba oil can add smoothness, while a bit of coffee or charcoal can deepen the shade. But the base remains simple: two natural ingredients, thoughtfully combined.
 Botox bob: here’s the haircut that makes you look “10 years younger” according to a hairstylist
| Item | Role & Use |
|---|---|
| 2 teaspoons pure aloe vera gel (clear, unscented) | Acts as the main base, providing natural hold, smooth application, and moisture |
| ¼–½ teaspoon unsweetened cocoa powder | Adds a soft, natural tint to enhance brow color |
| Small clean glass jar or lidded container | Used to safely store the prepared mixture |
| Clean spoolie or angled eyebrow brush | Helps apply and shape the product evenly on brows |
| Mini spoon or mixing stick | Used to combine and blend all ingredients smoothly |
Mixing the Gel: Calm and Intentional
Begin with about two teaspoons of aloe vera gel in a clean container. Add around ¼ teaspoon of cocoa powder, then stir slowly and thoroughly, pressing out any lumps. As the mixture blends, it turns a soft, creamy brown. Test the color on your hand—let it dry, then decide if you want more depth or softness. The gel should feel smooth and light, able to spread easily while staying in place on a brush. Once you’re happy with the consistency, seal the jar and let it rest for about an hour.
How to Apply the Gel with Care
This natural gel invites a more mindful approach. Start with clean, dry brows. Lightly dip your spoolie brush into the jar, then tap or wipe off the excess. Using short, upward strokes, guide the brow hairs in their natural direction. Work from the inner corners outward, shaping as you go. If needed, allow the first layer to dry and apply another for more definition. You can also use an angled brush to mimic fine hairs in sparse spots. The result stays soft and natural, never stiff or heavy.
Choosing Simplicity with Purpose
Opting for a homemade product is about more than just ingredients—it’s a personal choice to simplify. It reduces waste, avoids excess additives, and brings the creative act back into your hands. Each refill saves another plastic tube. Each use reminds you that beauty can be intentional, gentle, and close to nature.
 A hair transplant specialist is categorical: this 100% natural treatment prevents hair loss
Of course, every skin is unique. Patch testing is important, and small changes may be needed to suit your needs. Still, there’s something powerful in slowing down, in stirring a jar by hand, and brushing your brows with a mixture you made yourself. It’s a quiet reminder that beauty often starts with the simplest of things.
 “I’m a hairstylist and here’s the short haircut I recommend most to clients with fine hair after 50”